Showing posts with label DIY. Show all posts

Monday, December 6, 2010

Eat. Dance. Sparklers!

I'll admit it. I love sparklers. And ever since I saw this picture:


And this one:


I have been obsessed with having them at our wedding. With fireworks being illegal in NY State, I always thought my dream would not be possible. Until I saw this:


(a photo from a wedding - exactly one year before ours - at the same venue)

And now it is not just a dream, but a necessity! What a perfect grand exit and wonderful opportunity for some night photography!

In my early sparkler research, I found a cute way of showcasing our grand exit:


How cute would all of these sparklers look in nice vintage vases? Is anyone else using sparklers? How are you planning on handing them out?

Monday, November 22, 2010

Entertaining the Kidlets

While there won't be too many children at our wedding, they will be there. I think between the flower girls, the ring bearer and a few other select invitees, there will be a total of five children there (not including those under the age of one). And while a babysitter will be available for the reception, I still feel we should create activity kits for these kids, and make them feel special and included in our day. (Yes, I am adding yet another DIY project to my ever-growing list!)

Here comes the most important question: what do we put in these kits? The children will range in age from 3-10, so a coloring book, crayons, and stickers are a must. I also want to include some small, non-messy toys that also will not create a huge mess, like slinkies.

Are you including children in your wedding? What do you plan on doing to keep them occupied? Here are some inspirational photos to get you started!


Sunday, November 21, 2010

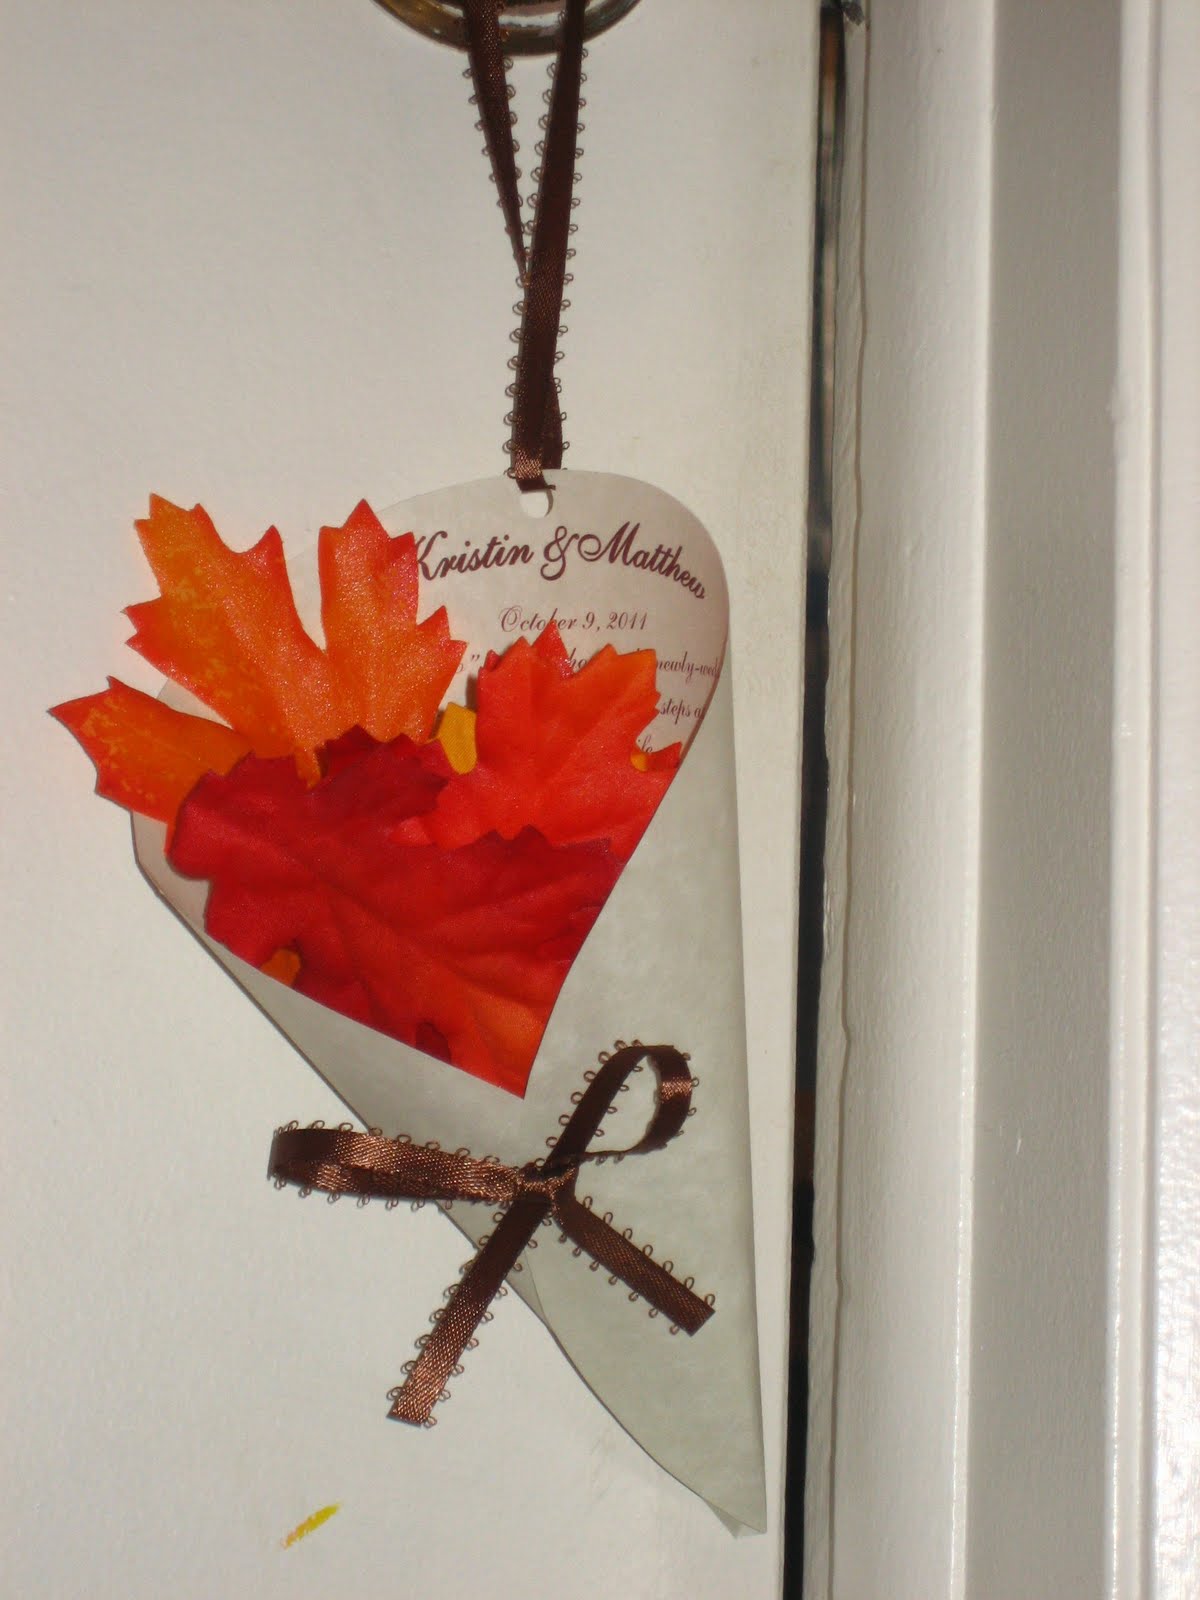
DIY Toss Cones: Part II

This morning I decided to turn to my dear friend Google for photo imagery of the perfect ribbon orientation for our toss cones. To my complete and utter shock and amazement, my blog appears on page two of the Google search, and our toss cones are the second photo to appear on Google Images! I have officially made it!

After my excitement had died down a bit, I turned my attention back to the task at hand: how on earth was I going to place ribbon on 150 toss cones, without it taking an hour per cone??

Here are some inspiration photos I found.


After looking at all these beautiful ideas, I set to work myself. Here is the end result:


I used a ribbon hole punch (purchased on sale at Michael's for $3) to create the bow in the front, and a regular one-hole punch to help create the top ribbon, which will allow the toss cones to hang from each chair at the ceremony (although looking at it, the regular one-hole punch seems to create a really large hole, and so I might try the ribbon punch on top as well!)

Wednesday, November 17, 2010

DIY Wedding Postcards


This is by far my favorite DIY project. It is also the most complicated and vexing project as of yet. I typically begin my projects with hours of online research - what did brides do before the internet? Once I have found two or three basic ideas I like, I try to combine them and put my own spin on them. However, what we are using this project for seems to have not been done before. Or if it has, no one felt the need to write about it. At all.

I am finding that one of the most difficult aspects of DIY projects is that unless you are going to copy someone else's project, you cannot know how something is going to turn out until you try it. At this point, a lot of time and money has been invested in something that may or may not look how you envisioned it. I like to think of myself as a laid-back, carefree person, but unfortunately, I have expensive envisionments. I expect high quality, but do not believe you need to pay a premium to get it. I enjoy doing things for myself, and love the personal touch it adds.

As far as my research into DIY photo postcards go, there are a few options. I can opt to spend $100+ and get them done through an online retailer. However, I want matte photos, and the only option available seems to be a glossy finish. Strike one.
I could have them printed at Staples for about $50, and then cut them myself. Problem? A month of looking for special wedding fonts has left me with great fonts, that unfortunately Staples does not have access to. Strike two.

The most promising template was found on Martha Stewart weddings. Printing photos at home on thick cardstock, cut out using deckle-edge scissors and use a stamp on the back to create your own postcard design. I immediately gathered the necessary supplies and set to work.


Initially, I was upset with the weight of the cardstock. I bought white 110lb cardstock, and after running it through my printer, it seemed pretty flimsy. Of course, once I let the ink dry overnight, the paper thickened right back up. However, it is still a bit thinner than I had expected. Also, I'm not sure how I feel about the deckle-edge scissors. While it creates a wonderful vintage look, it also creates multiple ways for the postcards to easily stick together, which may cause problems for guests.

Another option is to purchase 4x6 matte photo paper. The edge will not be as pretty, but then again, this is a vintage meets modern wedding, and the clean lines may add that modern touch. Also, the cardstock will be thicker. My one problem at this point is: will the paper be too thick to run through my printer?

Monday, October 25, 2010

DIY Tears of Joy Packets

Everyone cries at weddings. As FH would say, it's a "cheese explosion" (this is how he refers to the cheesy endings found in most romantic comedies). And so, I wanted to offer tissues to guests who may have forgotten, or not realized that they would need them.


Last week I went to Michael's (a local arts and crafts store) and gathered all the supplies I would need. This included:

Glassine envelopes
Craft Glue
Ribbon
Sticker Labels
Travel Tissues

Two tissues went into each envelope. Each spool of ribbon contained enough material for ten packets. And the labels were quick and easy to create using microsoft word and my printer. These will be placed in two baskets decorated with hot pink ribbon on a table at the ceremony entrance for guests.


PRICING:

Labels: $20 for 160
Glassine Envelopes: $6 for 100 (be sure and use those 40% Michael's coupons!)
Ribbon: $15 for 150 packets
Tissues: $4 for 4 packs, each containing 4 travel-size tissue packs
Craft Glue: $3

Final cost: less than 50c for each guest! All put together in less than 2 hours! Such a cute detail for low cost!

Sunday, July 25, 2010

Homemade Vintage Postcards


This is Poipu beach on Kauai, HI. We took this photograph while we were there last year, and through the magic of photoshop, surprise! It looks vintage!!

What do I plan on doing with a bunch of faded photographs, you may ask? Well, dear reader, let me tell you. We loved the idea of naming our tables instead of using table numbers. That way, no one feels like they are at the "leftover table", and it adds a bit of interest. We are using names of places we have visited that hold meaning to us in some way. For example, we spent a week on Poipu beach. We will also be using 3 Mile (where we got engaged), and multiple other locations that we haven't thought of yet!

As for how to let the guests easily locate their tables, we are going to create "vintage postcards". After using photoshop on each picture, we will print them out and then stick them to brown cardstock. On the other side of the cardstock, I have found some lovely deep pink polka dot cardstock that has words written on it in lightly visible cursive, made to look like someone was writing a postcard. Over this cardstock we will place small plaquards that state the name of the table in a fancy, yet readable, script.

So far this is quite a fun project, and I am looking forward to many more to come! If anyone would like to know how I created these photographs, please feel free to leave a comment or email me and I will be happy to forward the directions along!

Wednesday, June 30, 2010

Signature Colors


I actually spent the better portion of a week debating this. Which colors really define "us" as a couple? I had nooooo idea. I thought for a quick second about using brown and sage green, since those are the colors we chose to decorate our entire apartment with (from the drapes to the bedspread, right down to the shower curtain and hand towels!) But after an afternoon of staring at inspiration photos of green and brown weddings, I came to the conclusion that we were just brown and greened out. I had seen enough brown and green to last me a lifetime! We needed something new, something with some pop and bright color to it. Something that said..."us".

It was during our first month of engagement that I finally had it. Matthew was away for business training, and we spoke on the phone each night in place of getting to actually see each other. It was on one such phone call that inspiration struck! We were going back and forth with the cheesy "get to know you...what's my favorite" questions. When we came to color, I said his favorite was brown. It's true. He wears it all the time. Every chance he gets. He said mine was pink. I looked around...it's true! I not only own a pleathora of pink items, but most of what I wear consists of some shade of pink. And so it was decided: a deep shade of pink, and chocolate brown would be our colors! And it is completely "us".

A venue and a date


It's official. We are going to be married at the Otesaga Hotel on Lake Otsego, Cooperstown, NY, on October 9, 2011. Ceremony at 3:30 immediately followed by a reception in the ballroom. I'm extremely excited! 464 days to go!!

Engaged!


We are officially engaged! It was perfect. A lovely picnic on Lake Otsego, where we met, was followed by a huge surprise for me! Matthew went "to the bathroom" before we left the lake for dinner, and came back with his backpack.
"Why do you need your backpack??" inquisitive little me asked. "I bought you something for our anniversary." he says. We NEVER buy each other gifts. Uh-oh, I think. I knew I should have bought those John Mayer tickets he was begging for!
"If you want it, you have to close your eyes". Ok. Done. I open them, and see this perfect, sparkling diamond staring back at me. "What are you doing?" I ask. He looks at me, as if he cannot see anything else in the entire world, and simply asks, "Will you marry me?" I scream "YES!!" and hug him so tight we both fall over into the grass. It's the happiest moment of my life.
After he finally gets me into the car (I cannot stop staring at the ring) I realize I need to call my mom and tell her the good news! We're on our way to the restaurant for our anniversary dinner. He won't let me call! He keeps making up lame excuses that I know aren't true..."I need you to tell me how to get there" (wrong, being from Cooperstown both of us know exactly how to get to Cherry Valley)..."you'll have plenty of time when we get there" (wrong, you set the GPS yourself silly, which is telling me we're actually going to be 10 minutes late). But I play along and assume I'll call when I get to the restaurant.
Once we get there, I walk inside to both of our families sitting at a table for a surprise engagement party! It was a perfect evening...the first of 70 years of perfect evenings to come